AX / D365FO – Expired certificates renewal in D365FO
Dynamics 365 for Finance and Operations on a local development environment may all of the sudden start reporting problems with the server due to expired certificates.
To be sure, you should open the Event Viewer, expand Windows Logs in the left pane and click on the Application node. Look for Warning logs with source ASP.NET and inspect their content. Therefore, when you’ll see ExpiredCertificateException under Exception information, as seen in the image below, you’re dealing with expired certificates.
Following the steps below, you will identify and extend required certificates to get access to Dynamics 365 for Finance and Operations again.
Step 1: Identify Expired Certificates
Start Windows PowerShell as administrator and enter the following two commands:
cd cert:\LocalMachine\My
ls | Select-Object NotAfter,Thumbprint,Subject | Where-Object -Property Subject -like "CN=DeploymentsOnebox.*" | Sort-Object -Property Subject,NotAfter
You will get the list of certificates, required by D365FO:
The NotAfter column shows when each of them expires. The Subject column contains descriptive information about certificates. The Thumbprint column contains the key by which the certificate is recognized by the operating system.
In the image above you can see, that all four certificates have already expired.
Step 2: Clone Expired Certificates and Extend Their Validitys
For each of the four certificates repeat the following commands:
$Thumbprint = (get-childitem -Path 01F93A5974A14DC3B40F1CF0BE78127974187BE5 )
New-SelfSignedCertificate -CloneCert $Thumbprint -NotAfter (Get-Date).AddMonths(120)
Replace01F93A5974A14DC3B40F1CF0BE78127974187BE5with the thumbprint of the certificate you want to clone.
You’ll get a new self-signed certificate valid for 10 years, cloned from the existing one, with its new thumbprint:
Step 3: Update D365FO’s Config Files
To see the new list of certificates run the following command in PowerShell:
ls | Select-Object NotAfter,Thumbprint,Subject | Where-Object -Property Subject -like "CN=DeploymentsOnebox.*" | Sort-Object -Property Subject,NotAfter
Now you see two certificates for each of the certificate types – one with the old validity and thumbprint and one with the new validity (current date + 120 months) and thumbprint.
Now start VisualStudio as administrator and open the following three files in the C:\AOSService\webroot folder:
- web.config
- wif.config
- wif.services.config
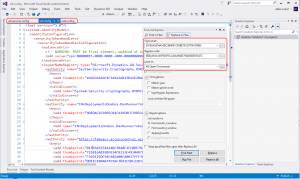
Press Ctrl+Shift+H key combination to open Find and Replace dialog. Make sure that you select All Open Documents in the Look in drop-down selection box, so that find and replace action will be applied on all three open files.
Now you will have to repeat the following actions for each pair of certificate types:
- In the Find what box enter the thumbnail of the old (expired) certificate.
- In the Replace with box enter the thumbnail of the cloned new certificate.
- Replace all the occurrences in open files.
After you have done this for all four certificates, save the three config files and close VisualStudio.
Restart your browser and navigate to D365FO. It should start without any problems.


Comments
Post a Comment